Most tutorials assume you’ll expose services from your premise through a public static IP. But that’s risky: small connections are easy to DDoS and lack redundancy.
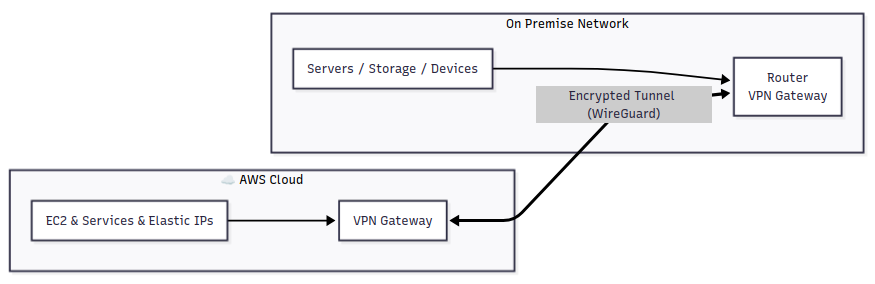
Instead of publishing my on-premise LAN directly, I decided to operate public IPs from AWS and route the traffic through a site-to-site VPN back to my own infrastructure.
- This allows me to use AWS Elastic IPs as the public face of my services,
- keep all real workloads running safely on my local network,
- add or move services without changing public DNS.
As a result, AWS is the IP gateway through which public traffic arrives at the on-premise network where all the workloads are deployed. In my case, I’ve opted for a WireGuard tunnel which joins these networks, so packets can travel in both directions as if they were on one extended LAN.
Networking pieces
| Purpose | Subnet | Notes |
|---|---|---|
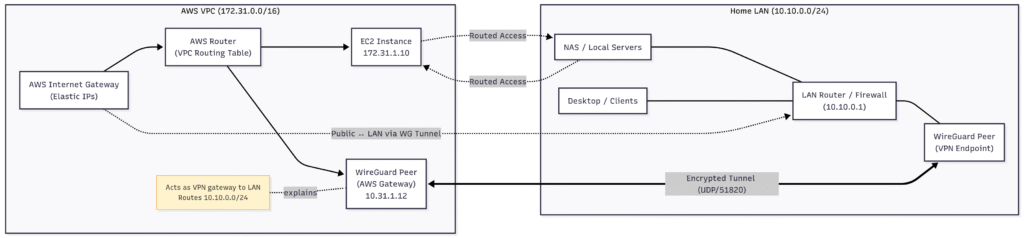
| AWS VPC | 172.31.0.0/16 | Where the EC2 and WireGuard gateway live |
| WireGuard | 10.8.0.0/24 | Point-to-point overlay between AWS and home |
| Home LAN | 10.10.0.0/24 | Where servers and clients actually reside |
Routing logic
- On the AWS side, the VPC route table points
0.0.0.0/0to the WireGuard interface.
That means any public traffic that reaches AWS can be forwarded through the tunnel. - On the on-premise router, a static route for
172.31.0.0/16points to the local WireGuard peer.
That gives your LAN full reachability to the cloud.
[Interface]
Address = 10.8.0.2/24
ListenPort = 51820
PrivateKey = <redacted>

# Firewall rules for routing between interfaces
PostUp = ufw allow in on wg0 to any
PostUp = ufw route allow in on wg0 out on ens5
PostUp = ufw route allow in on ens5 out on wg0
PostUp = ufw route allow in on wg0 out on ens6
PostUp = ufw route allow in on ens6 out on wg0
PreDown = ufw route delete allow in on wg0 out on ens5
PreDown = ufw route delete allow in on ens5 out on wg0
PreDown = ufw route delete allow in on wg0 out on ens6
PreDown = ufw route delete allow in on ens6 out on wg0
PreDown = ufw delete allow in on wg0 to any

[Peer]
PublicKey = <redacted>
PersistentKeepalive = 25
AllowedIPs = 10.8.0.0/24, 10.10.0.0/24
Endpoint = <redacted>:51820
[Peer]
AllowedIPs = 10.8.0.0/24, 172.31.0.0/16When the tunnel comes up:
- AWS sees
10.10.0.0/24as a reachable subnet through the WireGuard peer. - Your LAN knows to reach
172.31.0.0/16through its WireGuard endpoint.
Packets flow through AWS’s Elastic IPs → WireGuard gateway → your LAN router → internal hosts.
Connecting my on-premise network to AWS this way turned out to be an oddly liberating exercise. For the cost of a tiny EC2 instance and some routing rules, I now have a hybrid environment where my local machines appear to live in the cloud.
While it’s not a replacement for the fancy enterprise solutions like AWS Site-to-Site VPN or Transit Gateway—there’s no high availability, no fancy metrics—it works perfectly for my labs, testing, or small projects.
Thanks for reading!